ORC Week 3: My Secret to Large and Affordable Art
Hello everyone! Welcome to week 3 of the One Room Challenge!! We’re already halfway to the big reveal (just two more progress posts)! You can catch up on my previous weeks here: WEEK 1 + WEEK 2.
Please note that post contains affiliate links.

THIS PAST WEEK:
-Continued painting baseboards
-Other two black chairs were delivered
-Chose two chairs for the heads of the table (thank you Noir!!) ***
-Big art print was delivered + I mounted it to canvas
-Table lamp was delivered (thank you Troy Lighting!!)
-Found floor planter from TJ Maxx
-Hung up art from Scout Design Studio
-Failed at three different DIY projects
-Sold old dining table
WHAT DO I STILL HAVE LEFT?
-Finish painting baseboards (BLAH!)
-Finalize gallery wall idea
-Decide on DIY projects (bar cabinet? chair cushions? switch plates?)
-Table + two chairs not delivered yet
*** I saw a beautiful chair on this company’s website and I knew I had to include it in my design!! So I decided to take a shot in the dark and reach out to Noir and they agreed to partner with me on this challenge!! I really couldn’t believe it! It was way short notice, AND they’re located across the country in California! But oh my goodness- their furniture is so beautiful, and I’m so excited to have two of these chairs in my home! Keep scrolling down to see what chairs I picked!
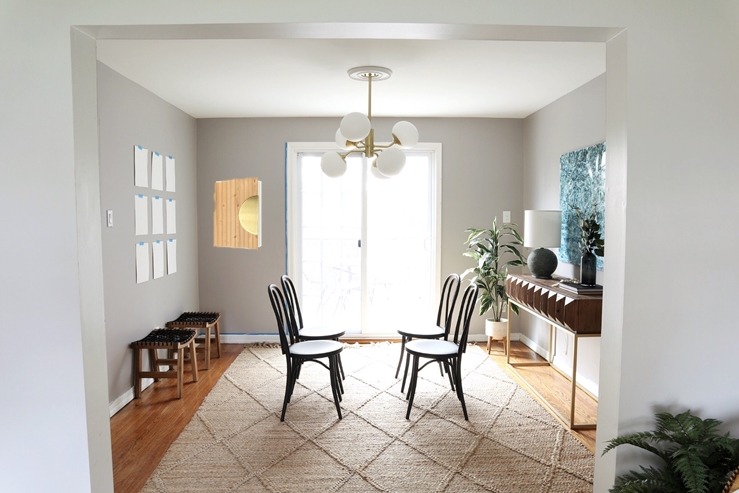
This past week, the large (36”x48”) print I ordered was delivered! I decided I wanted one large print over the console table versus a gallery wall because I thought it would be easier on the eyes. You see this wall when you first walk into our home and with it being open to the living room, I didn’t want it to be visually cluttered. I also think that the print I chose provides the perfect pop of color to an otherwise neutral room.
I wanted to let you all in my secret for large - yet affordable - wall art: find a printable file and have it printed yourself! Get creative with your printing methods too! For example, for this print I went to the “Signage + Trade Shows Display” section of Vistaprint and looked at the Poster options. I was able to have a 36” x 48” poster printed for $25 (using a promo code that I found through Google)! When you’re trying to find the best deal for art, you should look beyond just the website’s “Wall Art” or “Photo Printing” sections! And always search Google for coupon codes!!
For my art, I used a photo that my sister took while she was on vacation in Greece. When I was trying to find art for her beach house (as well as for my own home), I realized how hard it is to find the kind of water and beach photography that I was looking for. Luckily my sister has traveled to some pretty incredible places and took amazing photos! I’ll also be offering these printable files to purchase on my website if anyone is interested!

If you saw my Instagram stories earlier in the week, then you already know that I am planning to post an inexpensive way to hang large art (make sure to follow me if you’d like to see more behind the scenes updates!). Frames this size are insanely expensive, and also very hard to find! I decided I would buy a canvas the same size as the print (it was originally $48, on sale for 60% off and then I had a coupon for another 30% off). My original plan was to use mod podge and do a thin layer straight on the canvas and then lay the print over top. I’ve done this in the past with attaching fabric to canvas so I thought for sure it would work…. wellllll it didn’t! The print ended up just getting all wrinkled from the glue making it too wet or something. I was SO sad and thought I ruined my giant print!! Luckily the next day when the glue had dried, the print was a lot less wrinkly and I was able to salvage it.
I ended up using small nails and smoothing out the print onto the canvas, and then hammering the nails into the wood sides of the canvas. There are still some areas where if the light is hitting it right, you can see that the print isn’t totally flat… but overall I think it looks really good! I posted the steps to this part here. I still need to do part two of my large art DIY and create a wood frame for around the canvas… so stay tuned for that! (You could also just paint the white edges the canvas to blend in more with your art if you didn’t want to try and create a frame though)

Anddd can we talk about the other new addition to this view?! THAT LAMP! I fell in love with it when I saw it online, but oh. my. God. In person, it is even better! I knew that the chandelier I chose and the console table would be giving this room some major modern vibes, so to balance that out I chose this sort of earthy/ organic looking lamp. It is beyond perfect for this corner, I could not be happier!

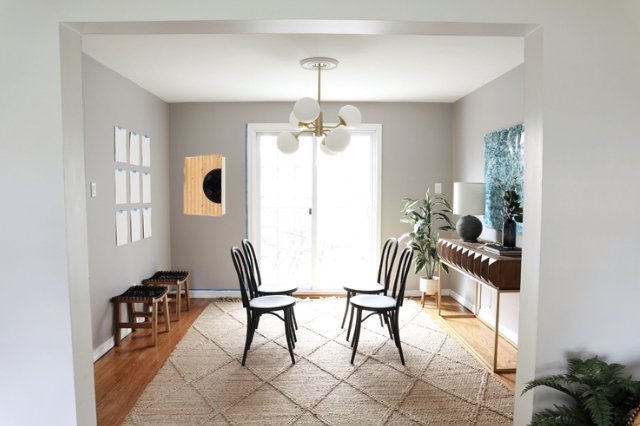
Here is how the room looks today. I finally moved the old MCM dresser to our living room to replace the TV stand we had. I moved the old TV stand in the playroom (until we can either sell it or move it down into storage). I love the two IKEA stools along that wall to the left of where the table will be. The room used to feel out of balance because that had nothing. The stools not only look pretty, but they’re functional too. They’re the perfect height for extra seating at the table if we decide to have a big dinner! They also tuck perfectly under the console table if we need to clear that path.

I taped up some paper so I could get a feeling for how a gallery wall grid would look above the stools. I also taped off the size of a wall mounted cabinet that I’m thinking about getting from IKEA. Taping stuff off is a great way to try and visualize if an idea you have will actually work or not. Obviously, it doesn’t account for the depth of the item- but it’s still a great way to see if the sizing will work in your room.
I’ve had a vision for a DIY bar cabinet for a few weeks now. It would be the perfect little addition to that small wall, and would be the perfect size to hold the very few liquor bottles we usually have (I’m a beer drinker) and the small bar accessories we like to keep handy- bottle opener + wine opener. I was planning to build my own from scratch- I found a few great DIY tutorials that I had planned to combine. Then I came back down to reality and realized that I’ve never built anything and I have zero wood working skills. If I had more free weekends to put towards this, I would definitely give it a shot… but since there’s a deadline quickly approaching, I decided to go a different route. I found this wall cabinet online from IKEA for $50, and I knew it would be the perfect black slate to customize! I would love to possibly use the wood slats from IKEA’s slatted bed base (not sure if they’re easy to remove) and attach them to the door of the cabinet to create a paneled look. For the handle, I’m imagining a semi-circle (made from wood?) and painted/stained either black or gold.

Based on my DIY success rate so far with this room, this project won’t go at all as planned. Fingers crossed it will go smoothly though!
I wanted to show one last progress photo this week. It’s the view of our living room looking into the dining room. I’m showing this because when I design a space that’s pretty open to another room, I always keep in mind how the two spaces will flow together.

Be sure to come back next week to see what new progress I’ve made and to hopefully see some more successful DIY projects!! Don’t forget to follow me on Instagram to see some behind the scenes decisions and updates! Here are the pieces of furniture that are supposed to be getting delivered next week:

As always, a HUGE thank you to the companies who are sponsoring me throughout this challenge!! It means the world to have your support!
RugsUSA: Area Rug
Scout Design Studio: Console table + Art
Mitzi: Chandelier
Troy Lighting: Table Lamp
Apt2B: Table (not delivered yet)
Noir: Two Chairs (not delivered yet)
I also want to thank Linda Weinstein, who created this amazing event! I’m so grateful that the One Room Challenge exists, it’s given me the opportunity to connect with so many other amazing people who are just as crazy about design as I am!!
